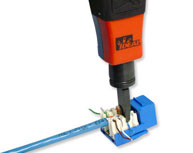
How to Terminate Punch Down Style Keystone Jacks
Step 1:Make sure the stripperis adjusted properly on a scrap piece of cable. The Stripper should be adjusted to only score the jacket to make removing it easier and not nick the twisted pairs. Using a Coaxial Stripper strip around 1 inch of the jacket off. Be careful not to nick the conductors as this will cause the wire to break or short out the connection causing problems down the road. Inspect all wires for damage before proceeding to step 2.
Step 2:Straighten the pairs out completely and lay them over the top of the keystone jack noting the color pattern for the 568b wiring. Note: Each keystone jack is slightly different in how they are labeled and how the colors are arranged. The 568B standard is most commonly used and ends of the cable must have the same standards to communicate. We have the 3 most commonkeystone jackstyles pictured here. The first jack pictured has the 2 standard pairs on the right, and the 2 variable pairs on the left. The A standard is the center column and the B standard is on the left. Both A and B standard applies to the right side of the jack. The solid color box with the lower right corner missing represents the solid color wire with the white stripe. The white box with the colored tip represents the white wire with the colored stripe.
The second jack pictured here has both A and B standardson both sides of the jack, with the color code running down the center. The solid color rectangle represents the solid color wire with the white stripe, wile the half white half color rectangle represents the white wire with the colored stripe. The third jack pictured here has the A and B standard codes labeled on the outside of the jack. With the A standard on top and the B standard on the bottom. The solid box represents the solid wire with the white stripe Wile the box with the white diagonal stripe going throught the middle, represents the white wire with the colored stripe.
Step 3:Keeping the pairs as twisted as possible press the wire into the correct groove with your thumbs. If you completely straighten the wires to run them through the jack you will risk cross talk between the pairs.
Step 4:Using a punch down toolpunch the wires down into the blades built into the keystone jack. The blades in the jack are designed to work with solid cable, and may not work with stranded cable. Make sure the blade (as noted in the picture) is facing the outside of the keystone jack. If you reverse it you will cut the wires inside the keystone jack rendering them useless. The punch down tool should cut off the remaining pieces of the wire on the outside, but sometimes you may need to punch them down a 2ndtime and wiggle the wire to it breaks clean off. Once this is done you can install the dust covers if your keystone jack comes with them. This keystone jack did not have the covers.The covers should never be used to do the job of the punch down tool.


 Facebook
 Twitter
 RSS
RSS
 YouTube